Have you ever Googled ‘how to make perfect half or soft-boiled eggs’ and came away feeling disappointed that the answers you got didn’t quite work? There are many reasons why your eggs didn’t turn out so picture or texture perfect, but one of the important ones is that most of the answers online come from foreign articles using foreign eggs. The truth is, however, that Malaysian eggs are different from American eggs, British eggs, Australian eggs, Japanese eggs, etc. And what makes them different comes down to a multitude of possible reasons, including weather, chicken breeds, feed, handling and storage requirements, and so on.
One may argue that an egg is an egg is an egg – and in terms of its protein, vitamin and nutritional values, an egg is definitely an egg – but anyone who has cooked eggs abroad will tell you that there is a marked difference. Malaysian eggs, for one, tend to be smaller in size. So are Japanese eggs. Our egg shells are also thinner, and the whites tend to be more watery, making them trickier to handle when preparing dishes like poached eggs.
We’re not making poached eggs here though. Instead, our first eggsperiment takes it back to basics – identifying the time required to cook the perfect egg, be it half-boiled, soft-boiled or hard boiled. We wanted to develop a Malaysian egg chart, one that can also be applied to other countries with access to eggs like ours, such as Singapore, Indonesia and Brunei, as well as others with tropical climates.
Parameters
To ensure consistent findings, some parameters were established:
- All eggs were purchased on the day of the eggsperiment
- The eggs were not refrigerated and were kept at room temperature
- Eggs were numbered to identify them
- We used regular eggs (kampung eggs are marginally smaller in size, so there could be a marginal, but not significant, difference in results if you’re using them)
- Plain tap water was used
- An egg was removed every minute and transferred to an ice bath to cool
- All eggs were removed and cooled before they were peeled for the reveal
Eggsperiment preparations
The eggsperiment was kept straightforward and simple with no fancy equipment utilized.
- All eggs were numbered 1 to 24, marking each minute an egg will be removed from the pot.

- All eggs were piled into a metal colander that fits completely inside the pot. To make life a tad easier, the longest boiling egg was placed at the bottom of the pile, while the shortest boiling egg was placed at the top. The colander also helps reduce egg movement and allowed us to put all the eggs into boiling water at one go.
- A large heavy-bottomed pot was filled with sufficient water to cover all the eggs.

- While the water was brought to a rolling boil, a large bowl was filled with water and lots of ice to cool the eggs down quickly. Eggs will continue to cook within the shell if it is not cooled down immediately.

Making boiled eggs
- Once the water reached a rolling boil, the colander of eggs was gently and carefully lowered into the pot to ensure minimal egg cracking from the sudden heat. A few eggs did crack on us, but not enough to discard them from the equation. The heat was not turned off to maintain consistent temperature and the water was kept at a rolling boil.

Note: Water temperatures will dip when eggs enter the pot. If using a non-heavy bottomed pot, there may be a slight difference in your first one or two eggs compared to our findings, as the time it takes for the water to reach boiling temperature again may differ. Water reaches boiling temperature slower in a heavy-bottomed pot, but retains heat at a consistent temperature – one reason why we recommend heavy-bottomed pots or pans for most types of cooking.
Note: Unless your eggs crack and break apart in the water, a regular crack – whether it leaks a small amount of egg whites or not – will not aversely effect the length of time to produce the results you want. However, it will affect texture and shape as water is pushed in through the shell, creating dents or impressions on the eggs. They’re still good to eat though.
Ice bath
- One minute after the eggs were put in, the first egg was removed and immediately transferred into the ice bath. All eggs were removed accordingly to their time and number every subsequent minute after.
- The 24th and final egg was allowed to cool in the ice bath for a few minutes before the next step.

Note: Each cooked egg added into to an ice bath raises the water temperature, which, in turn, melts the ice a little. This is why you need to use a lot of ice to ensure the water remains cold throughout, especially if you’re preparing a lot of eggs. One tray of ice will not be sufficient unless you’re preparing three or four eggs only. We used an entire bag of ice for 24 eggs. Having extra ice on standby is also recommended, especially if you’re boiling eggs in the hundreds.
Post-preparation
Once the eggs cooled, we used a knife to gently cut across the narrowest part of the eggshell, revealing the egg’s contents. As per the boiling removal method, we began with egg 1 and worked our way towards 24. The first few eggs only had about 1cm off the top removed, as we knew the eggs would be mostly liquid. As the egg began to firm up, more of the shell was removed. Eggs 13 to 24 had their shell removed completely.

Apart from the first six eggs, the rest were also cut in half to reveal a cross section of yolk and egg white. The first six were not halved to maintain better structure and visibility off yolk and egg white.
Note: If you find yourself in a situation that requires cutting through the eggshell, a very sharp knife and a firm, but gentle, grip is key. Grip too hard and you may find the shell breaking on you, especially once it has been breached.
The results are in!

Using continuously boiling water ensures the eggs continue to cook at a consistent temperature of 100°C throughout regardless of the length of time. Only the first one or two eggs may cook at under 100°C depending on how long it takes the water to reach boiling temperature once again. However, most people don’t consume eggs with the level of doneness achieved at minutes 1 or 2. Therefore, for consumption purposes, the egg chart below provides a definitive time guideline to help you cook your eggs at the consistency you like.
Overall, based on the results, there is a marked difference for eggs cooked between minutes 1 to 12, while eggs 13 onwards remained consistent. The table below provides more detailed results.
Time
Results
1
Whites: mostly raw with a thin cloudy layer along the inner shell
Yolk: completely raw
2
Whites: about 70% is cloudy but soft
Yolk: still raw
3
Whites: completely cloudy but soft
Yolk: mostly raw
4
Whites: starting to get some structure, but still remains soft
Yolk: half cooked with a soft custard consistency
**Good for soft half-boiled eggs
5
Whites: still soft but with more structure, the parts touching the inner eggshell is starting to firm up, but not enough to allow for peeling
Yolk: perfectly cooked through with the consistency of custard
**Makes perfect mamak-style half-boiled eggs
6
Whites: firm but not completely hard and can be peeled with care
Yolk: starting to develop chalky edges but is mostly moist with a liquid custard centre
**The leap between minutes 5 to 6 is quite distinct, this is a great soft-boiled egg
7
Whites: firmer
Yolk: outer yolk is cooked and chalky, while the centre remains moist, with a small amount of liquid custard goodness
**At minute 7, eggs are slightly beyond soft-boiled
8
Whites: firm
Yolk: moist
**Makes good hard-boiled eggs with a soft but not liquid yolk
9
Whites: firm
Yolk: still moist but starting to dry a little
**This also makes good hard-boiled eggs
10
Whites: firm
Yolk: marginally drier
**Still good for hard-boiled eggs
11
Whites: firm
Yolk: chalky all the way through with a little bit of moisture
12
Whites: firm
Yolk: perfect chalky yolk without being dry
**Excellent hard-boiled eggs especially when paired with nasi lemak!
13-17
Whites: firm
Yolk: chalky and dries marginally the longer it cooks
**Hard-boiled egg safe zone, especially when making hard-boiled eggs en masse
18
Whites: firm
Yolk: outer part shows signs of a light grey colour
**Aesthetically, the egg has cooked for too long, however, no grey-green line is visible in a cross section cut
19-24
Whites: firm
Yolk: continues to dry marginally and the grey on the outside of the yolk is more obvious with each passing minute
**The 24th egg shows no sign of the grey-green ring in a cross section cut, which means it requires a significant boiling period for egg yolks to achieve that unsightly colour
**Eggs with the grey tinge and rings are edible with no distinct difference in flavour, but it does look less refined on a plate.
Butterkicap recommends
4
minutes for half-boiled eggs
5
minutes for mamak-style half-boiled eggs
6
minutes for perfect soft-boiled eggs
8-10
minutes for hard-boiled eggs with moist yolks
12
minutes for perfect hard-boiled egg with chalky yolk
13-17
minutes for hard-boiled eggs safe-zone
A note to ponder
Many people globally make half and soft-boiled eggs by bringing water to a boil, removing the pot of boiled water to a non-hot surface, adding the eggs, covering the pot and letting them cook for x amount of minutes. However, this technique has a high tendency of producing inconsistent results due to the rate at which the water temperature drops. Water in a heavy-bottomed pot, for example, will cool at a slower rate compared to an aluminium pot. The amount of water and number of eggs in the pot will also affect cooling times. Additionally, room temperature can hasten or decrease cooling rates – your water will cool faster on a cold day or in an air conditioned room compared to a very hot day.
Additionally, as the water cools, it takes longer for the middle part of the egg to cook as the heat is unable to penetrate it sufficiently. This can result in an unevenly cooked egg, with a layer of firm structured whites near the inner shell and completely uncooked whites and yolk throughout. Furthermore, this method takes longer to produce a cooked egg overall.
Variables
The method we used should yield consistent results when using most Malaysian eggs. However, it’s important to note that there are variables that can affect cooking time and results, even if marginally:
- Freshness of the eggs.
- Conditions of transport and storage from farm to market or supermarket.
- Whether the eggs were refrigerated or kept at room temperature. Eggs straight from the fridge may take a little longer to cook, especially during the first few minutes when the egg is just starting to warm up.
Do note we’re talking about chicken eggs. Duck or quail’s eggs are a whole other ball game, but rarely are those eggs consumed half or soft-boiled.
If your perfect egg done-ness lies between a certain number of minutes, don’t be afraid to adjust your timing by 10 to 15 second increments. And when you find the timing you like best – jot it down! However, if you’d much prefer to have perfect soft-boiled eggs from the get-go without having to think about it, we recommend using that plastic egg contraption so commonly found at kopitiams and mamaks. Read our review below.
That half-boiled egg contraption
Any true blue Malaysian would have seen or know of the half-boiled egg plastic contraption, a popular gadget in any legit kopitiam or mamak and even the occasional household. It seems to consistently make perfect half-boiled eggs every single time, so we added it to our eggsperiment know for sure.
Invented in 1973 by a young bulldozer operator working in the jungles of Kelantan, Datuk Hew Ah Kow probably wouldn’t have guessed his invention would take the half-boiled egg-making world by storm. All you need is the half-boiled egg cooker, your (room temperature) eggs, freshly boiled water, and a little bit of time.
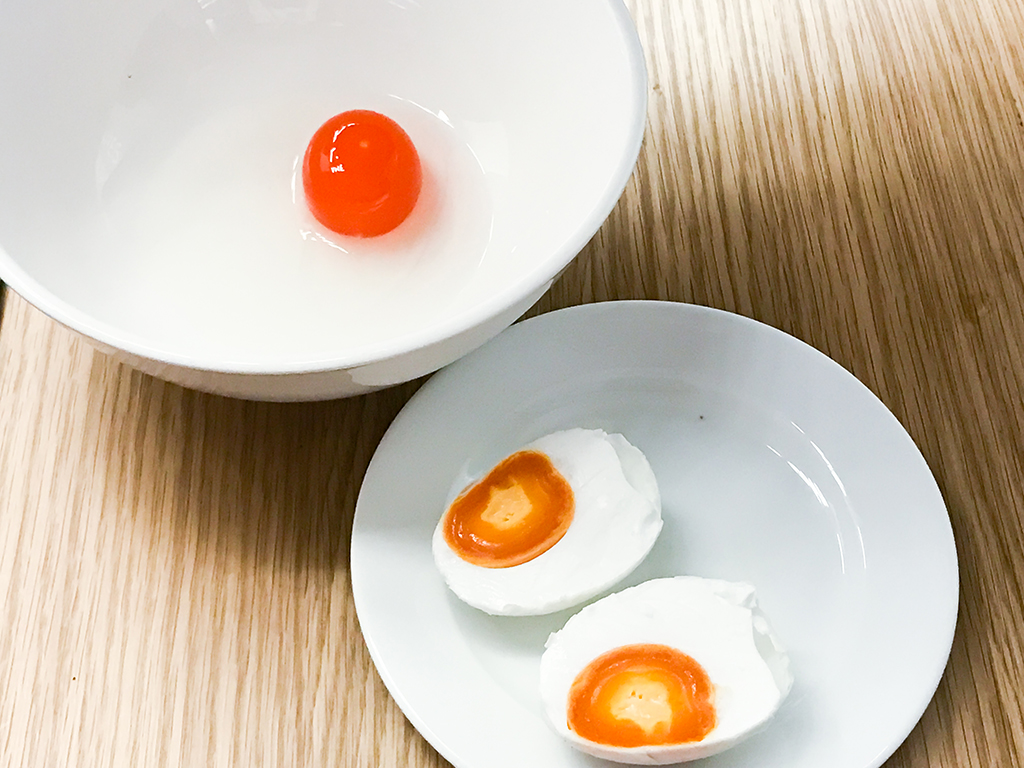
Putting it to the test
For variety, we used one regular and one kampung egg. Feel free to use whichever you like best, although we recommend kampung eggs for an extra rich yolk flavour.

Freshly boiled hot water was poured into the egg cooker according to the levels indicated inside the cooker.

Important tip: do not pour freshly boiled hot water directly onto the eggs as the shell will crack from the ‘shock’. Instead, pour the water into an empty area or against the inner wall of the contraption if it contains several eggs.
Preparing your half boiled eggs this way does take a bit more time compared to cooking your eggs in a pot, but perfection is worth the wait, right? Wait until the water has completely drained from the contraption.
The eggs will still be quite hot, so handle with care. They’re best served immediately.
Ready for the reveal?


Will you look at that. Both eggs are cooked to perfect doneness. Don’t you just feel like adding a bit of white pepper and a splash of soy sauce to both these bowls and slurping them up?
Tip: Chef Nik Michael Imran suggests having your telur setengah masak with a dash of sweet soy sauce for extra oomph.
So, it’s true. The half-boiled egg cooker really makes perfect half-boiled eggs. And if this is how you like your eggs, we really recommend you getting one for the home. It takes all the guesswork out of preparing this popular local breakfast. Just make sure you follow the instructions, use freshly boiled water, and eat the eggs immediately when they’re ready.
A note on kampung eggs vs regular eggs
While regular eggs were used for this eggsperiment, we highly recommend using kampung eggs for your daily consumption as we support healthier and happier chicken lifestyles.

Kampung eggs are not necessarily laid by ayam kampung. In fact, store bought telur kampung most commonly refer to free-range type eggs, which are laid by chickens who eat a more natural diet and are allowed to roam freely. Sizewise, kampung eggs tend to be slightly smaller, with shells that are pale in colour. When cracked, you’ll notice its yolk is bright orange. A cooked kampung egg yolk is also noticeably richer in flavour.
Regular eggs are typically laid by mass-farmed and caged chickens. These chickens are fed a wheat-based diet which is also occasionally enhanced with specific nutrients, like Omega-3. They don’t get to move around very much. The egg shells are brown, while the yolk is more yellow than orange. Regular eggs are also slightly larger, and sometimes available in sizes, although the size most commonly found in our markets and supermarkets is ‘Medium’. Rarely are Large or Extra Large eggs available for sale here.
There has been some argument as to whether kampung eggs are healthier compared to regular eggs. Unfortunately, we’re not equipped with the know-how or equipment to test this. However, the general consensus is that both these types of eggs have the same protein and fat content.
It’s also important to note that egg shell colours are actually determined by the breed of chicken and not by their living conditions. If you’ve had the opportunity to visit supermarkets or organic farms overseas, it’s not unusual to come across white, blue or even grey-toned egg shells as well as various brown-toned eggs. Here in Malaysia though, our egg colour chart is very straightforward.
Share with us!
So, how do you like your eggs? If you used our timing chart to cook your eggs, hashtag us with #butterkicap to share with us your results!